ServiceNow CI/CD pipeline

Automate your ServiceNow CI/CD pipeline
Before diving into the topic, it's important to note that you can automate your SN CI/CD pipeline with SN itself (via Flow Designer and more specifically with the help of the CICD spoke) or via a third-party plugin like Jenkins or Harness. In this article, I'll mainly focus on the former - automating your SN CI/CD pipeline with Flow Designer!
To clarify more thoroughly, there are two components to the SN CI/CD pipeline:
- There's the CICD spoke that hooks up the Integration Hub (which I cover in the first part: Automating your SN CI/CD pipeline with Flow Designer)
- There are also some CI/CD Rest APIs that you can hook into existing pipeline tools like Jenkins that can help you to extend your CICD pipeline (this is the second part of the article: Automating your SN CI/CD pipeline with third-party tools (i.e., Jenkins)
Note 2: regarding the question of whether this can be done with global update sets not tracked via git or source control, as mentioned by Sherwin Ghavam (in the LinkedIn post comments), the whole purpose of ci/cd pipelines and releases is to not use the legacy update sets anymore.
NOW Platform CICD
Intro
- NOW Platform CICD spoke enables better developer collaboration & deployment processes for faster time-to-value
- CI/CD pipeline ensures developers can choose which files they want to commit. So, they don’t have to push or commit the entire app to the enterprise app GitHub repository
- For orchestration (from testing [ATF tests] to deployment), you can use third-party tools like Jenkins or OOTB spokes for integration Hub
- DevOps & CI/CD pipeline can work together. They are not mutually exclusive
- You can build peer and code security reviews into the CI/CD pipeline. You're not restricted to the standard (DEV - TEST - PROD) pipeline. You can expand your pipeline according to your needs

Automating your SN CI/CD pipeline with Flow Designer
Practical example:
Use case: deployment process going from a DEV instance onto a PROD instance via a TEST instance using the CI/CD capabilities
The CI/CD flow looks as follows:
- There is a DEV1 environment (this is where you do all your magic code)
- There is a GitHub repo (this is where your magic code can be committed or pushed from your DEV1 instance)
- There is a TEST instance (this is where ATF tests are done)
- As last, there is a PROD instance (this is where the tested app is going to be pushed or committed)
- ⇒ These instances and the GitHub repo are all tight together!
- Note: the FLOW behind the CI/CD flow is called: Deployment Request Flow CI/CD

Scenario:
So, a scenario could be the following:
- The main developer is working on a script in his branch, while the junior developer is also making some changes in the app on his branch
- These two developers can decide at any time to push their branches to the enterprise GitHub repository
- The CI/CD pipeline also makes it possible for the developers to cross-check their work. So, if the junior developer commits something, then the main developer can cross-check the branch of the junior developer to ensure that everything looks good
- Best practice: commit as early as you can

- Note: in the commit comment you can put the story number and like this, you can tight/integrate the Agile development app with the CI/CD pipeline
- Now, the branches of the two developers are pushed to the GitHub repo
- The next step is to retrieve the changes from the GitHub repo to the PROD instance
- How?
- By submitting the Application Deployment Request (CI/CD) record producer in the PROD env

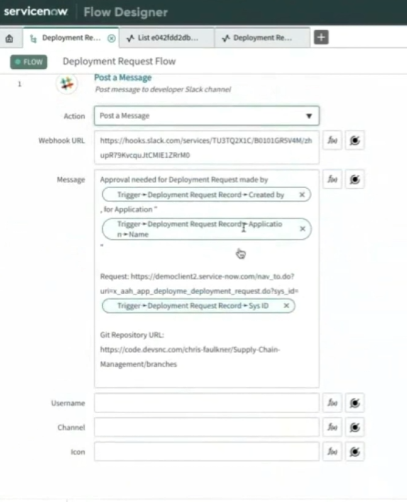
- After submitting the record producer, the flow will send a notification to the dedicated Slack channel where other developers can get notified that changes were made (this is done through the Slack Webhook)

- The logic behind it looks something like this in the flow designer:
- Next, developers can click on the Request link (deployment request) in the Slack chat to check the details of the request in PROD:

- In the Approvers Related List you can approve the request to proceed;

- Once you are done with the approval, then go to the GitHub repo to merge all the developer's branches with the master branch

- After this phase, you should have all the branches merged and closed. The master branch should be updated with the latest code
- Click on the ‘Deploy’ button

- This is the actual Trigger in the Flow designer

- The flow is going to kick off to update the DEV1 with the master branch (from the app GitHub repo):

- From DEV1, the app will then be published into the app's GitHub repo:
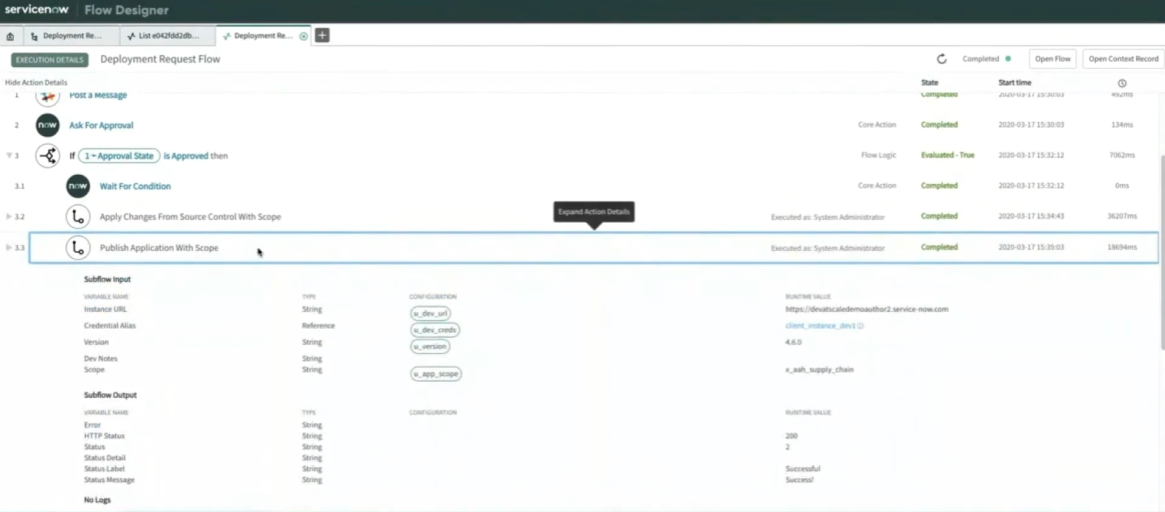
- Once the app is published, then the app is going to get installed on the TEST instance (which is going to run the ATF tests) from the app GitHub repo

- The next phase is where the ATF tests will run

- Once it runs the ATF tests in TEST, then it’s going to be automatically installed on PROD

- On PROD, navigate to the Application Manager to see the app:

- => Essentially, this is how you automate an entire deploying process from DEV1 to TEST (run ATF tests) and eventually to PROD by just using the Flow Designer
Tools (spokes)
- The spokes that makes this flow/logic possible are these:

- These spokes are part of the CICD spoke (which is OOTB) that you can use to set up a CI/CD pipeline as shown above
- CICD spoke allows you to move things between instances with automation from the source control (app repo). It can run ATF tests; it can install plugins, etc.
Summary of Flow CICD pipeline
- Commit branches from DEV to the GitHub repo
- Pull the branches in the GitHub repo (and merge them together)
- Create a Request in PROD
- Notify via Slack message
- Approve the Request
- Deploy the Request
Q&A
- Can you deploy from a branch and not deploy all changes from the master branch in PROD?

- Can the CI/CD pipeline support more than one instance?
Reference:
Automating your SN CI/CD pipeline with third-party tools (i.e., Jenkins)
To automate your SN CI/CD pipeline with a third-party tool (i.e., Jenkins), SN empowers you to use Scripted REST APIs. These are the tools/techniques that you need to leverage to build a CI/CD pipeline with third-party tools.
An example of a Scripted REST API is: ATF testing:

Another example of a Scripted REST API is: installing an app from the app GitHub repo:

QUICK SETUP GUIDE
- Link to Source Control for an application created on your instance. You'll find the link on the main page for your GitHub repository if you're starting fresh. Recommend to link to "master" or "main" branch initially.
- At the root of your Git repo directory, create a new file called "Jenkinsfile". Copy paste this pipeline template into it. Feel free to make modifications to fit your needs and workflows. Remember to change your environment variables to match your application's sys_id, ATF Test Suite sys_id, etc. On the first time, you can commit and save to the master branch without running the pipeline yet.
- To set up Credentials for authenticating into your instances with a service account, go to your Jenkins homepage, "Manage Jenkins" in the left navigation panel, "Manage Credentials" under Security, "(global)" domain, add a new "Username with Password" credential. Plug in the ID you name the credential with into the Jenkinsfile variable.
- To set up Credentials for connecting to GitHub, do the same workflow for the above, but use your GitHub username and a Personal Access Token. At a minimum, you'll need the following list of scopes: admin:org_hook, admin:repo_hook, repo, user:email, workflow.
- To set up your first Jenkins pipeline, go to your Jenkins homepage, click on "New Item" in the left navigation panel, "Multibranch Pipeline". Select "GitHub" for Branch Sources, select the Credentials you generated for GitHub, fill in the repository URL from GitHub, and validate the connection. For Discover Branches, select "All Branches" for Strategy. You can leave everything else at default. You can validate that things are working if the Scan Repository Log actually picks up your branches from GitHub.
- You should now be able to create a new feature branch off master branch on your instance, develop features/fixes, commit to Source Control, create a PR, and your CI build will run automatically. Once our CI build passes and your PR is completed and feature branch merged to master, your CD build to deploy the application to production should trigger as well.
How does the pipeline work
The default pipeline has three branches:
- Build - this is where remote changes are applied (from the relevant branch back down to the DEV instance and then publishing the application version from that branch)
- Test - this is where the application gets installed (just published to the app GitHub repo from the DEV instance repo) into the test instance. Then on the test instance, the ATF test suite gets running. Once the ATF tests are completed, a pull request is completed as well and we can merge that branch into the master branch
- Prod - if the master branch has a merge come in then it kicks off the CICD pipeline which deploys the application. The browser will install the app to PROD
Scenario
Imagine you pick up a story from the backlog. You need to create a new feature off the master branch
STEPS
- Apply remote changes (by ensuring that the master branch has the latest updates)
- Create a new branch (i.e., feature branch)
- Once that new branch has been created, it's going to trigger the build stage (in the CI/CD pipeline), in Jenkins (based on the Jenkins file)
- While you're waiting for that, you can do some feature work on our new feature branch. For example, you might make a change to the script include. Also don't forget to change the app version
- Commit changes (to the app GitHub repo)
- Open the pull request (in the app GitHub repo
- As part of triggering the pull request, the CI/CD pipeline is going to do a build and deploy into TEST; and run the ATF test suites; if it's passing then we should merge it into the master
- Merge the pull request (which means that the feature branch will be merged into the master branch which also means that the app will get deployed to PROD)
- Don't forget to validate this by checking your PROD instance
References:
Other resources:
- https://docs.servicenow.com/bundle/xanadu-api-reference/page/integrate/inbound-rest/concept/cicd-api.html
- https://medium.com/@akhilyerrapragada905/implementing-cicd-in-servicenow-using-flow-designer-81152a0f4c9d
- https://developer.servicenow.com/blog.do?p=/post/cicd-pipeline-github-actions/
- https://gitlab.com/ServiceNow-DevX/sncicd-gitlab-pipeline
- https://www.servicenow.com/community/developer-articles/devops-ci-cd-automation/ta-p/2320348
- https://qualityclouds.com/servicenow-ci-cd-setting-up/
- https://community.jenkins.io/t/servicenow-cicd-plugin-to-run-atfs/7306
- https://www.servicenow.com/community/developer-forum/how-to-setup-atf-for-ci-cd-pipeline/m-p/1451086
- https://www.reddit.com/r/servicenow/comments/tfqqd7/are_you_using_cicd_with_servicenow/
- https://www.youtube.com/watch?v=FybGNPqG1ew&t=1864s&ab_channel=ServiceNowDevProgram

Comments
Post a Comment